How To: Create API CRUD Operations in .NET 6 using ADO.NET
How to build an ASP.NET Web API in .NET 6 with ADO.NET and retrieve data from an SQL server

In this article, I would like to demonstrate how to build an ASP.NET Web API in .NET 6 with ADO.NET and retrieve data from an SQL server. Although entity framework is usually used for CRUD operations, ADO.NET is still equally competent and useful. A major advantage is its control over SQL commands and operations, which one can argue to be quite useful when retrieving data from a database.
Nonetheless, if your go-to is entity framework, that's great. Now you'll learn how to use ADO.NET.
Please bear in mind:
- I am using Visual Studio 2022, .NET 6, and Microsoft SQL Server Management Studio 18 ).
- I have already created my local database using SQLExpress. As such, this article will not cover setting up the database.
All right, let's get to it.
As usual, I have highlighted the steps ahead of time for anyone looking to skim through this article.
Steps Involved:
- Create a New Web API Project
- Add and Call the Connection String from the AppSettings Configuration File
- Create a Model that Mirrors the Information on the Table in the Database
- Add the Properties you Require from the Table
- Create a Folder Called "Data" to Hold the CRUD Methods
- Pass the Connection String to the SqlCrud Class
- Run the Application
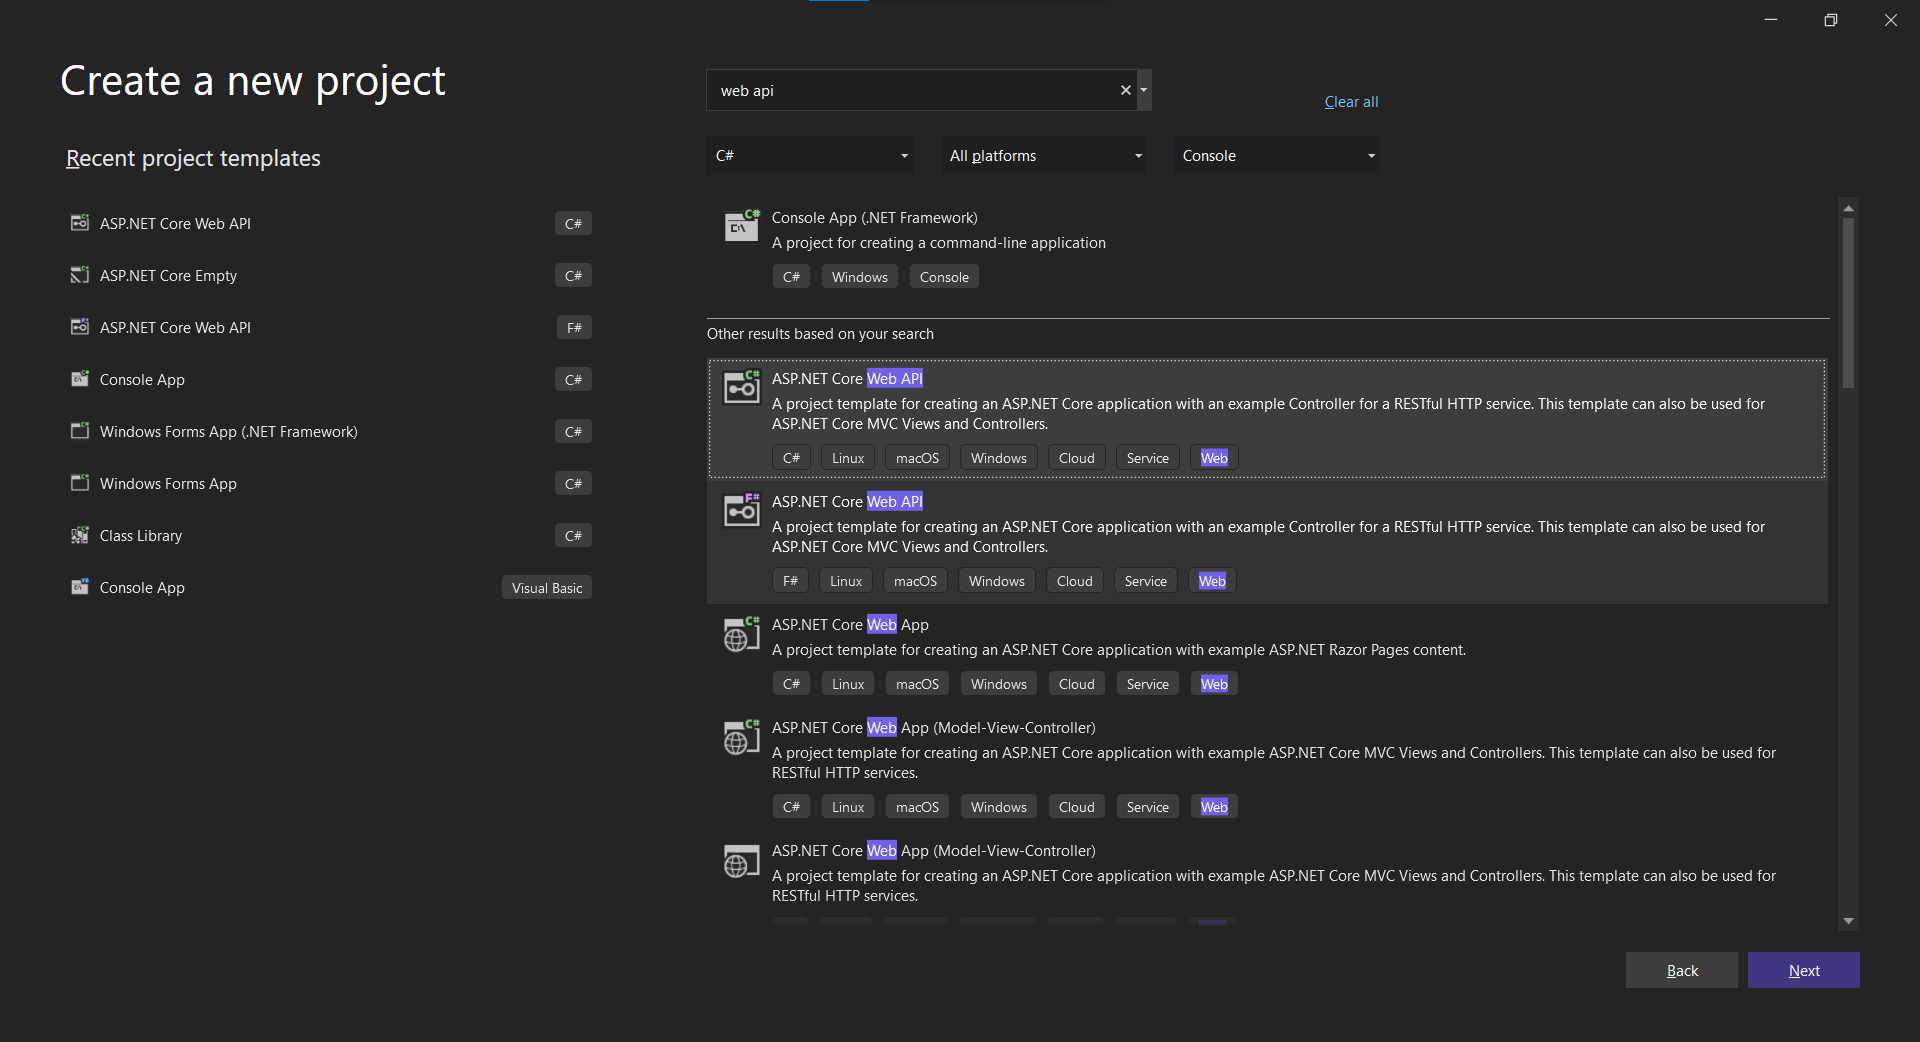
Step 1: Create a New Web API Project
To create the project, select ASP.NET Core API under the list of projects.
Followed by a name for your API
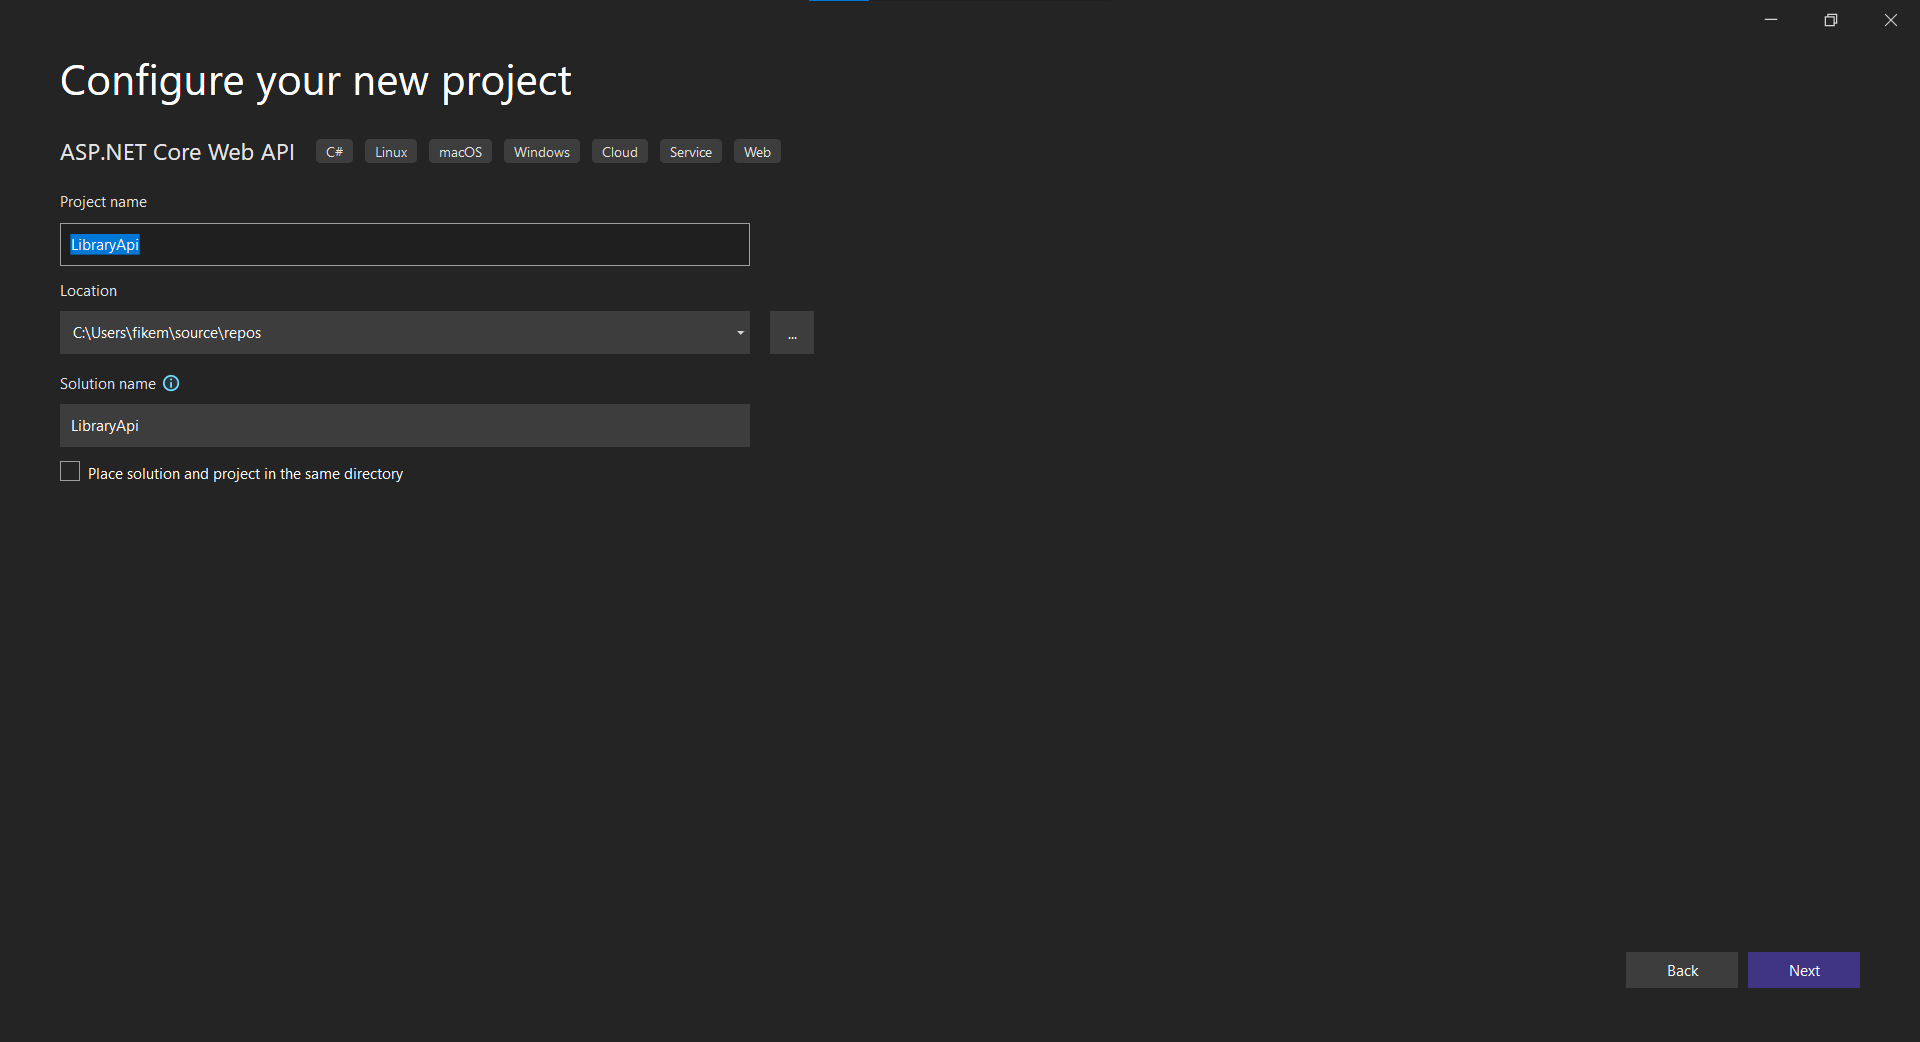
Then lastly, the additional information for setting up your API. We would not be performing any sort of authentication for this API.

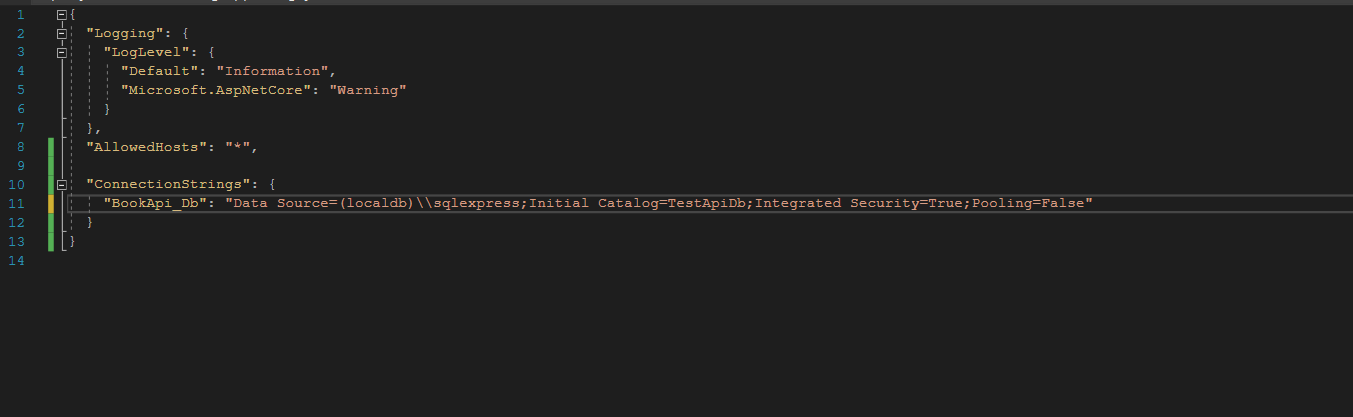
Step 2: Add and Call the Connection String from the AppSettings Configuration File
To add our connection string to our configuration file, we simply need to create a new tag called ConnnectionStrings with a subtag called BookApi_Db.
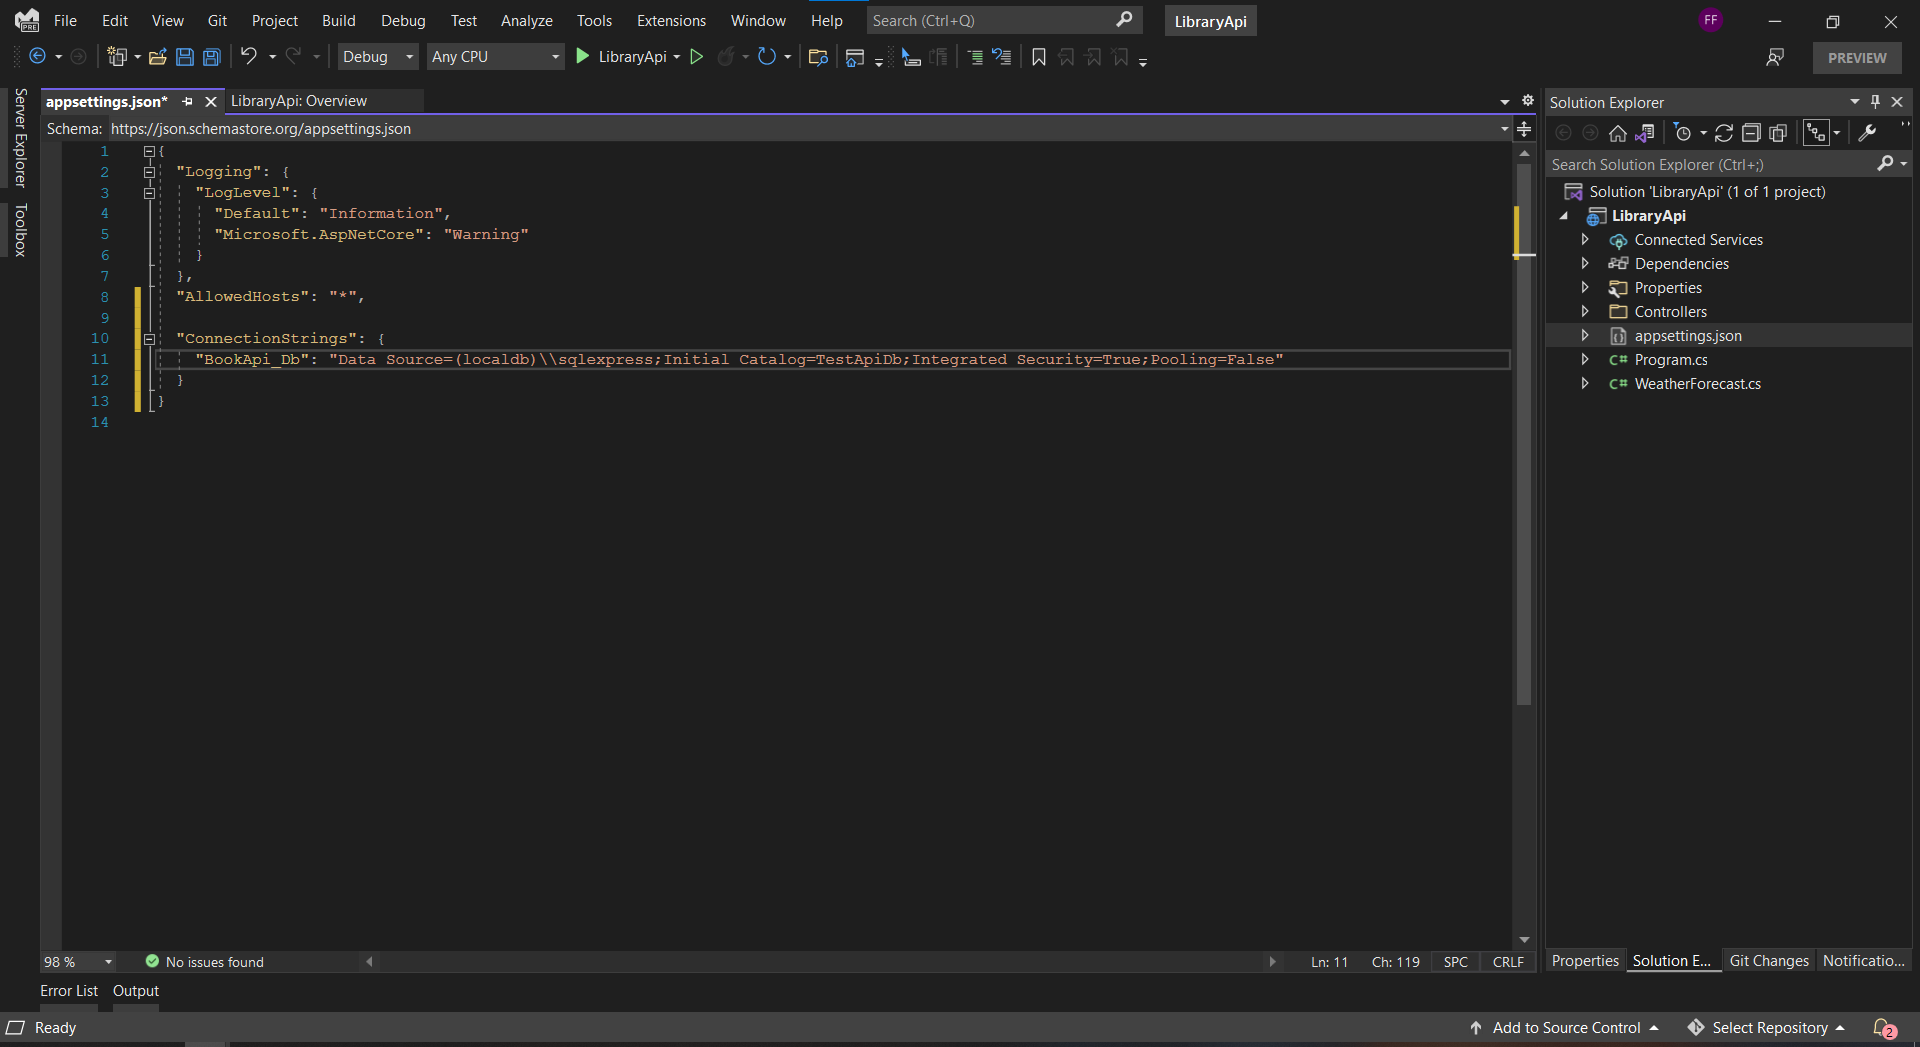
You are absolutely free to use a different name for your main tag and subtag. Just be sure to stay consistent when calling these tags.
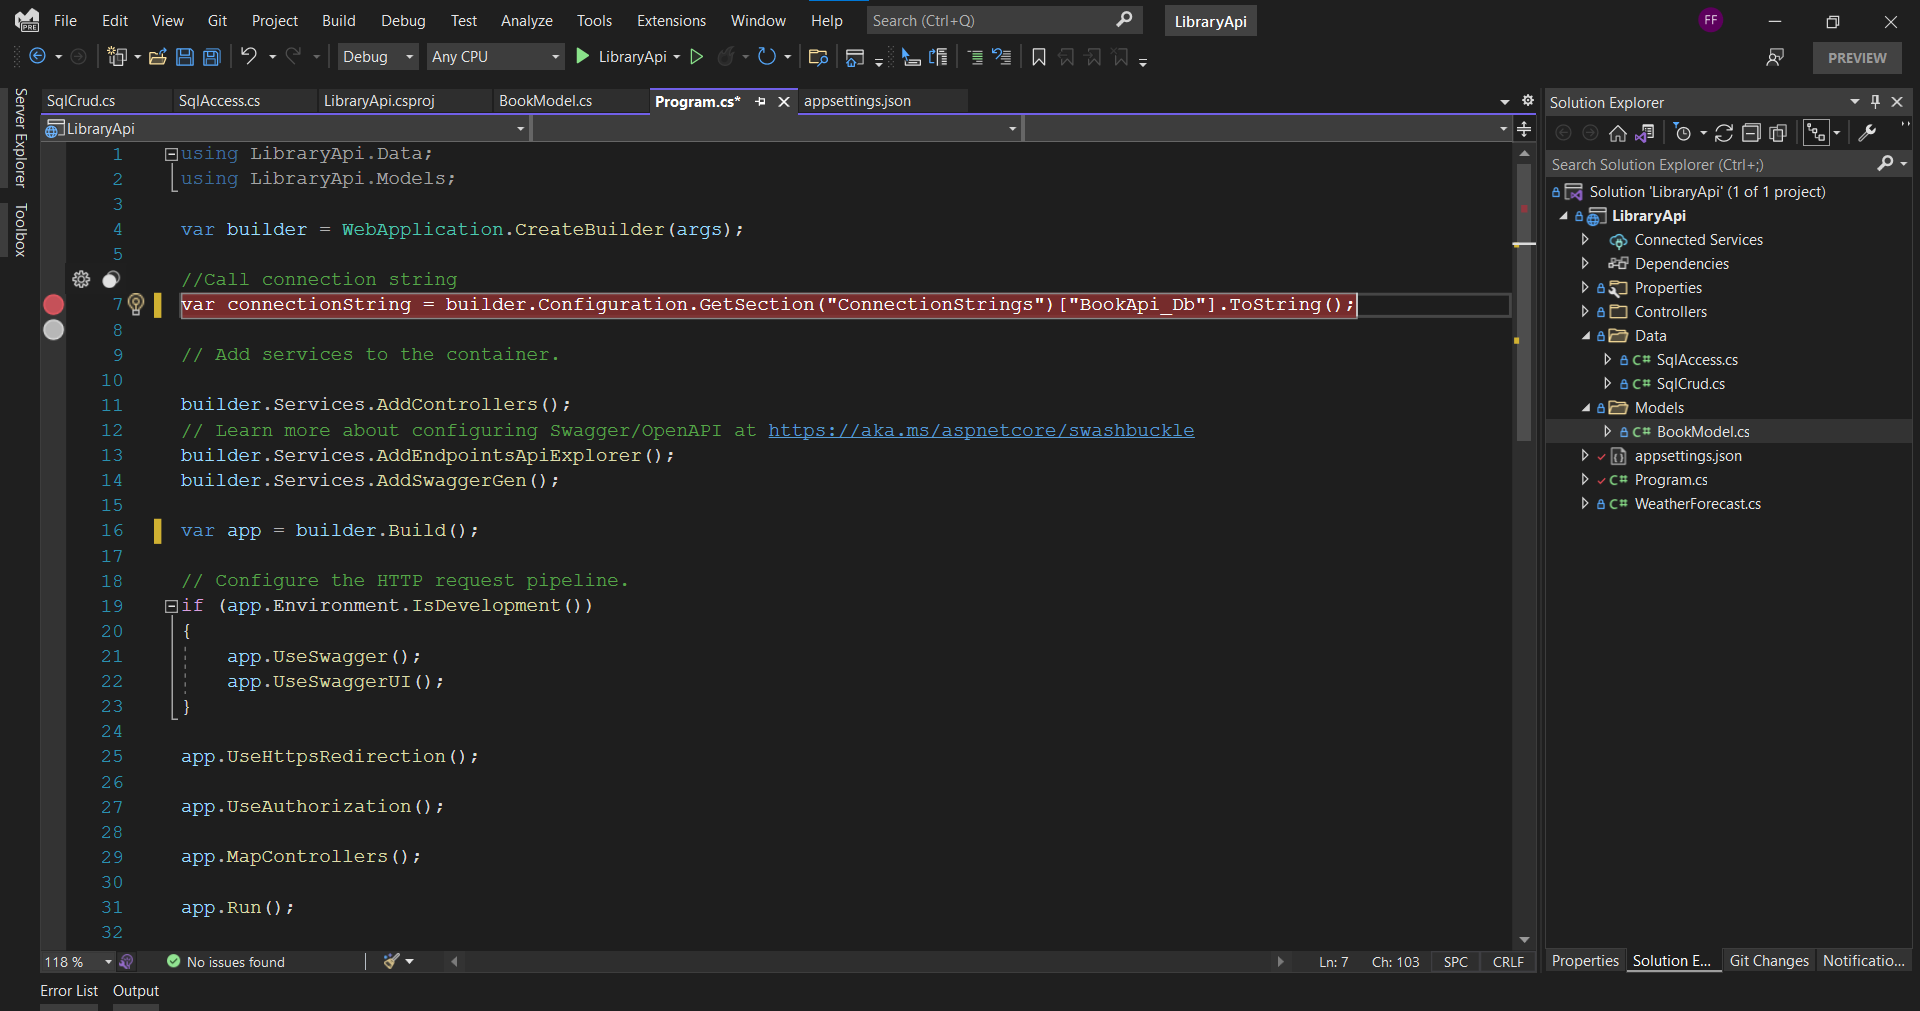
To call our connection string, we can use the Configuration.GetSection method available to us within our WebApplicationBuilder variable (builder)
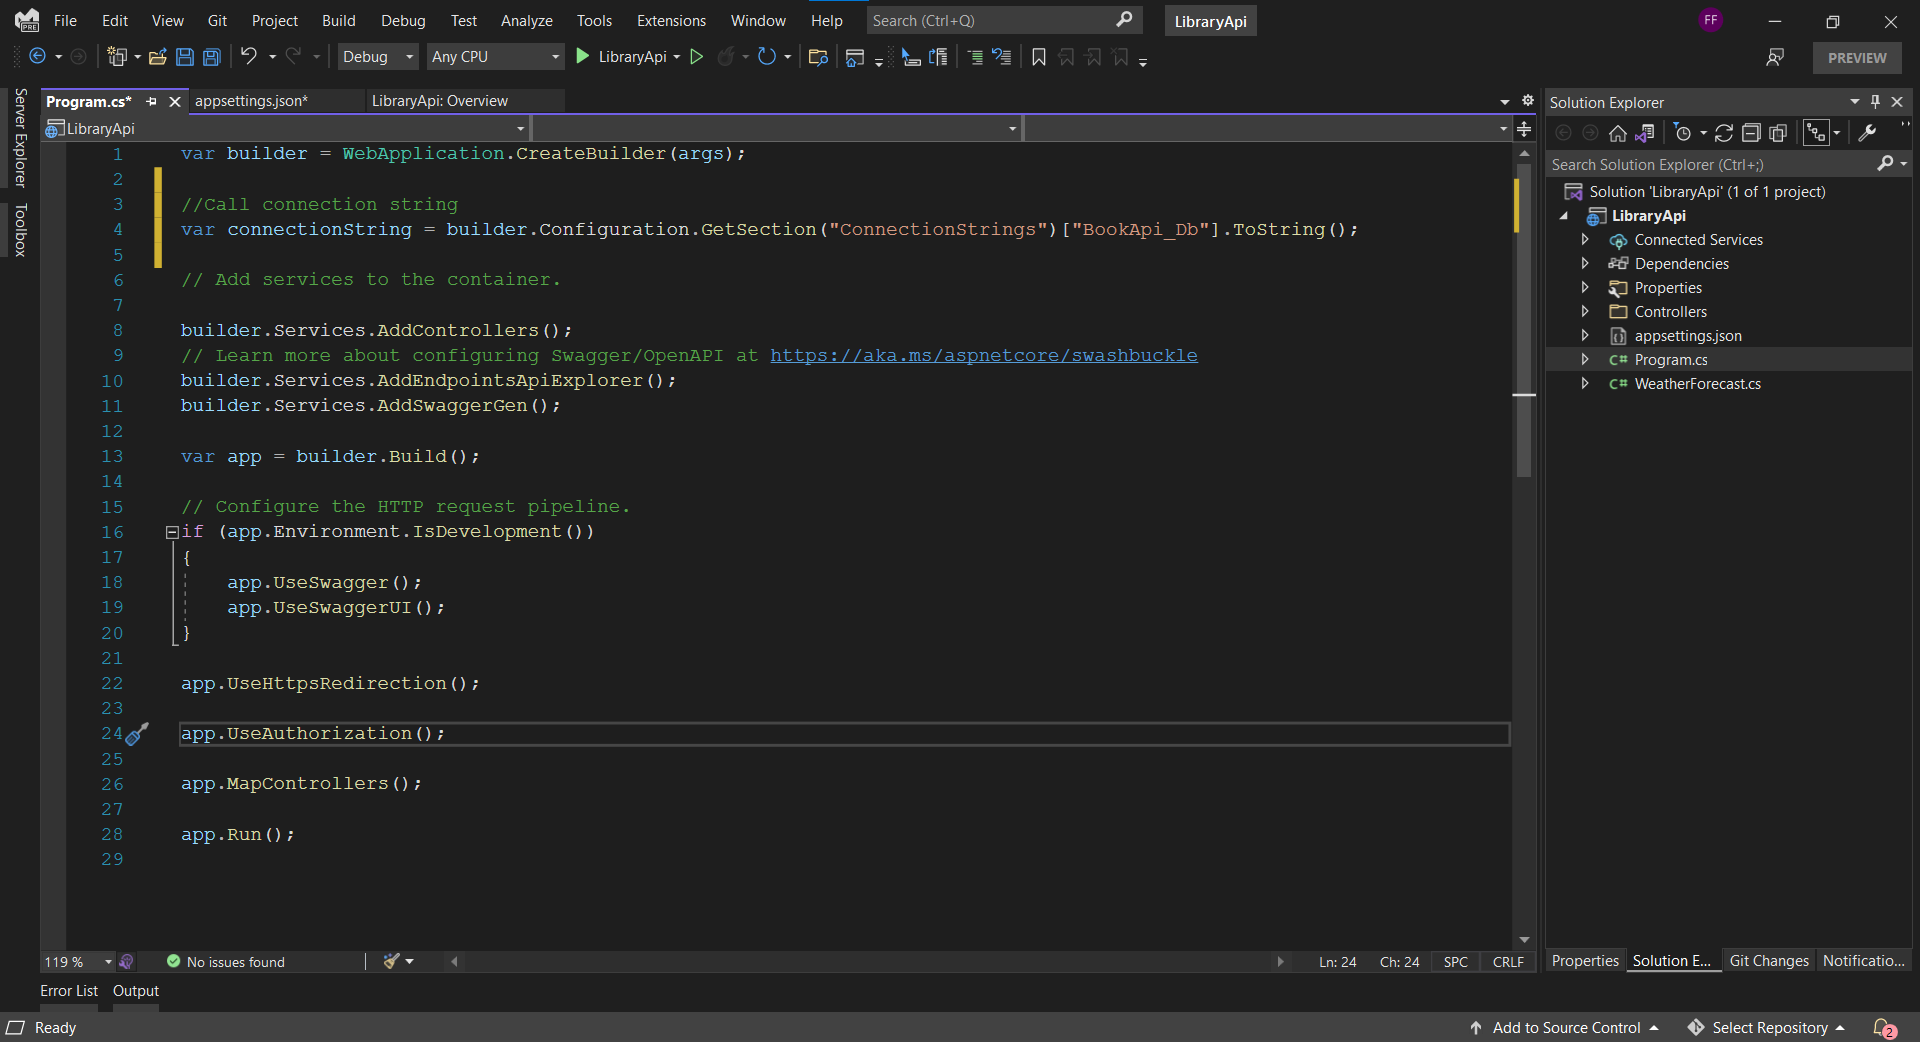
If you would like to test this method, simply put a breakpoint at the connectionString variable and run your application, it will return the connection string from the config file.
To put a breakpoint, click in the far left margin next to a line of code as shown below
Step 3: Create a Model that Mirrors the Information on the Table in the Database
For this step, we need a folder called Models to hold our Model class and a BookModel.cs file to hold our properties.
Properties are simply objects (variables) used to get - retrieve or set - pass the values of a class outside of the model class. In our case, outside the BooksModel class.
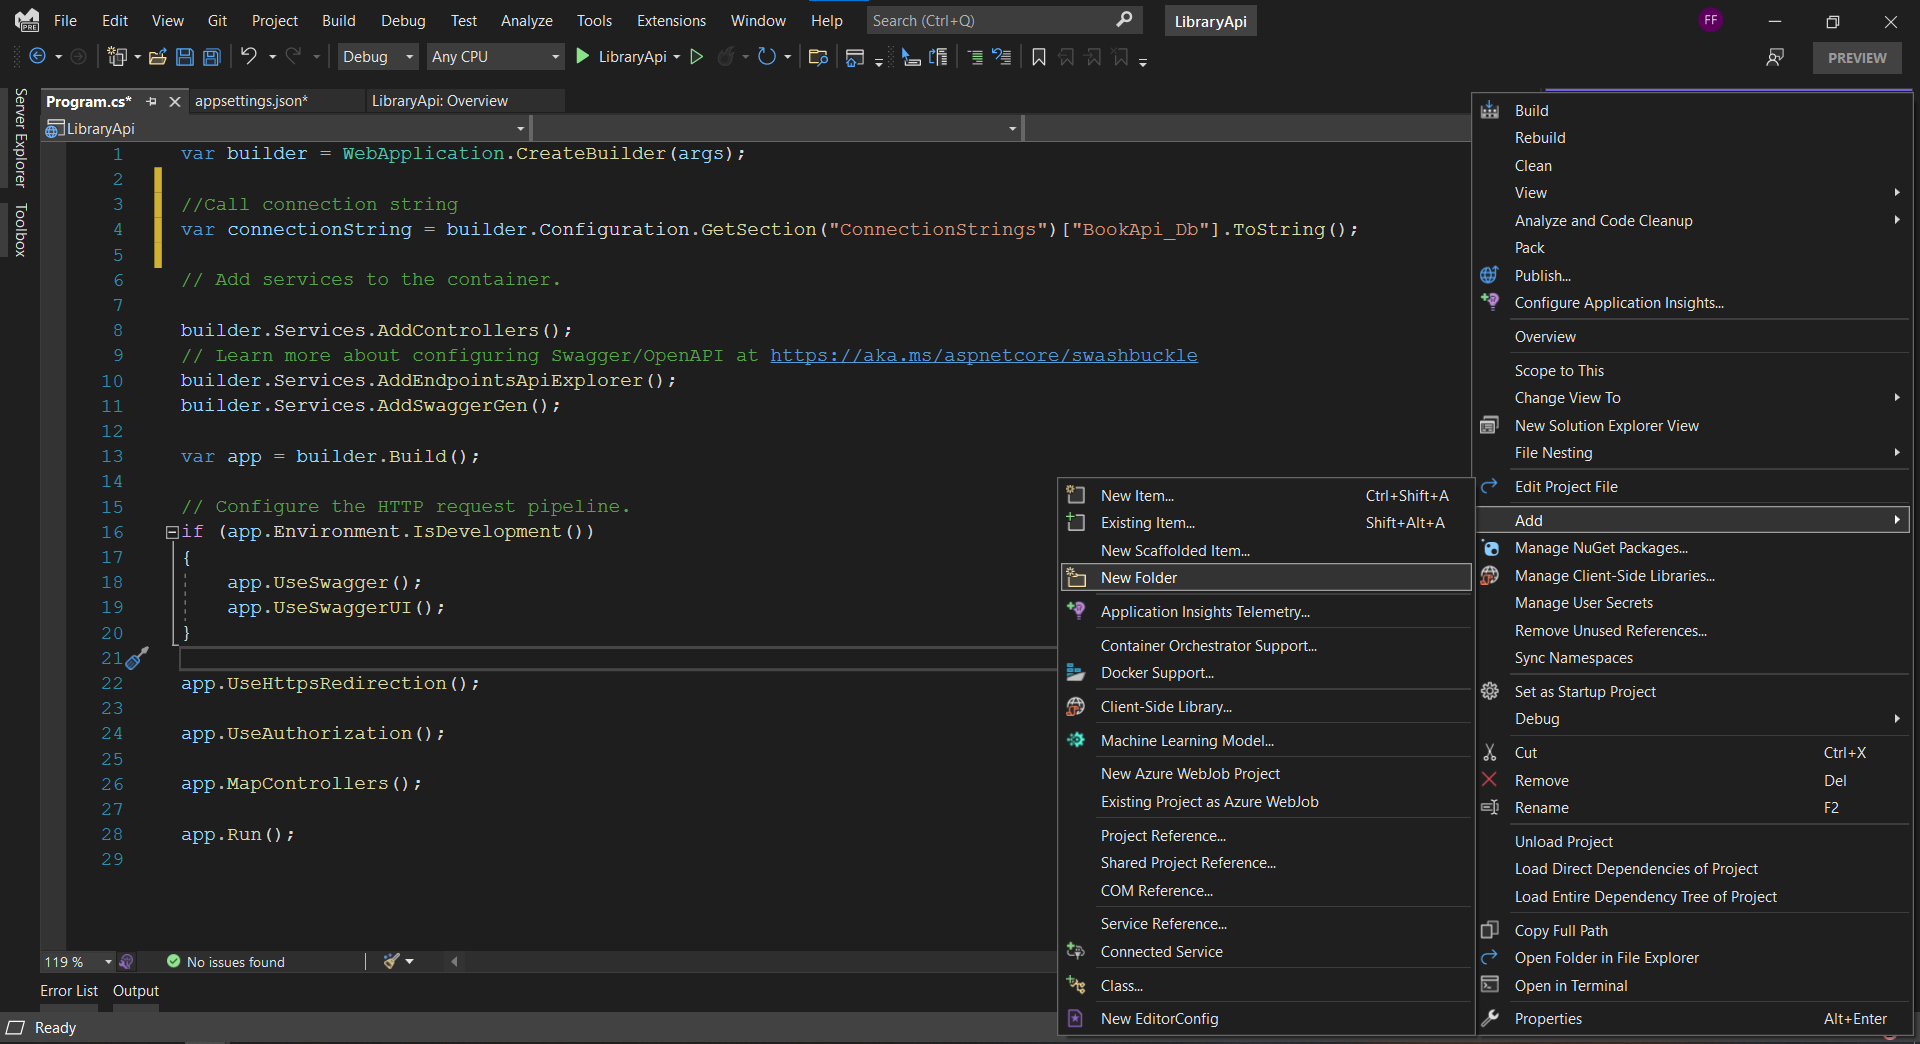
To do all these, right-click on the project file (the section just below your solution name). Navigate to the Add option and select New Folder

Right click -> Add -> New Folder -> Name the folder Models
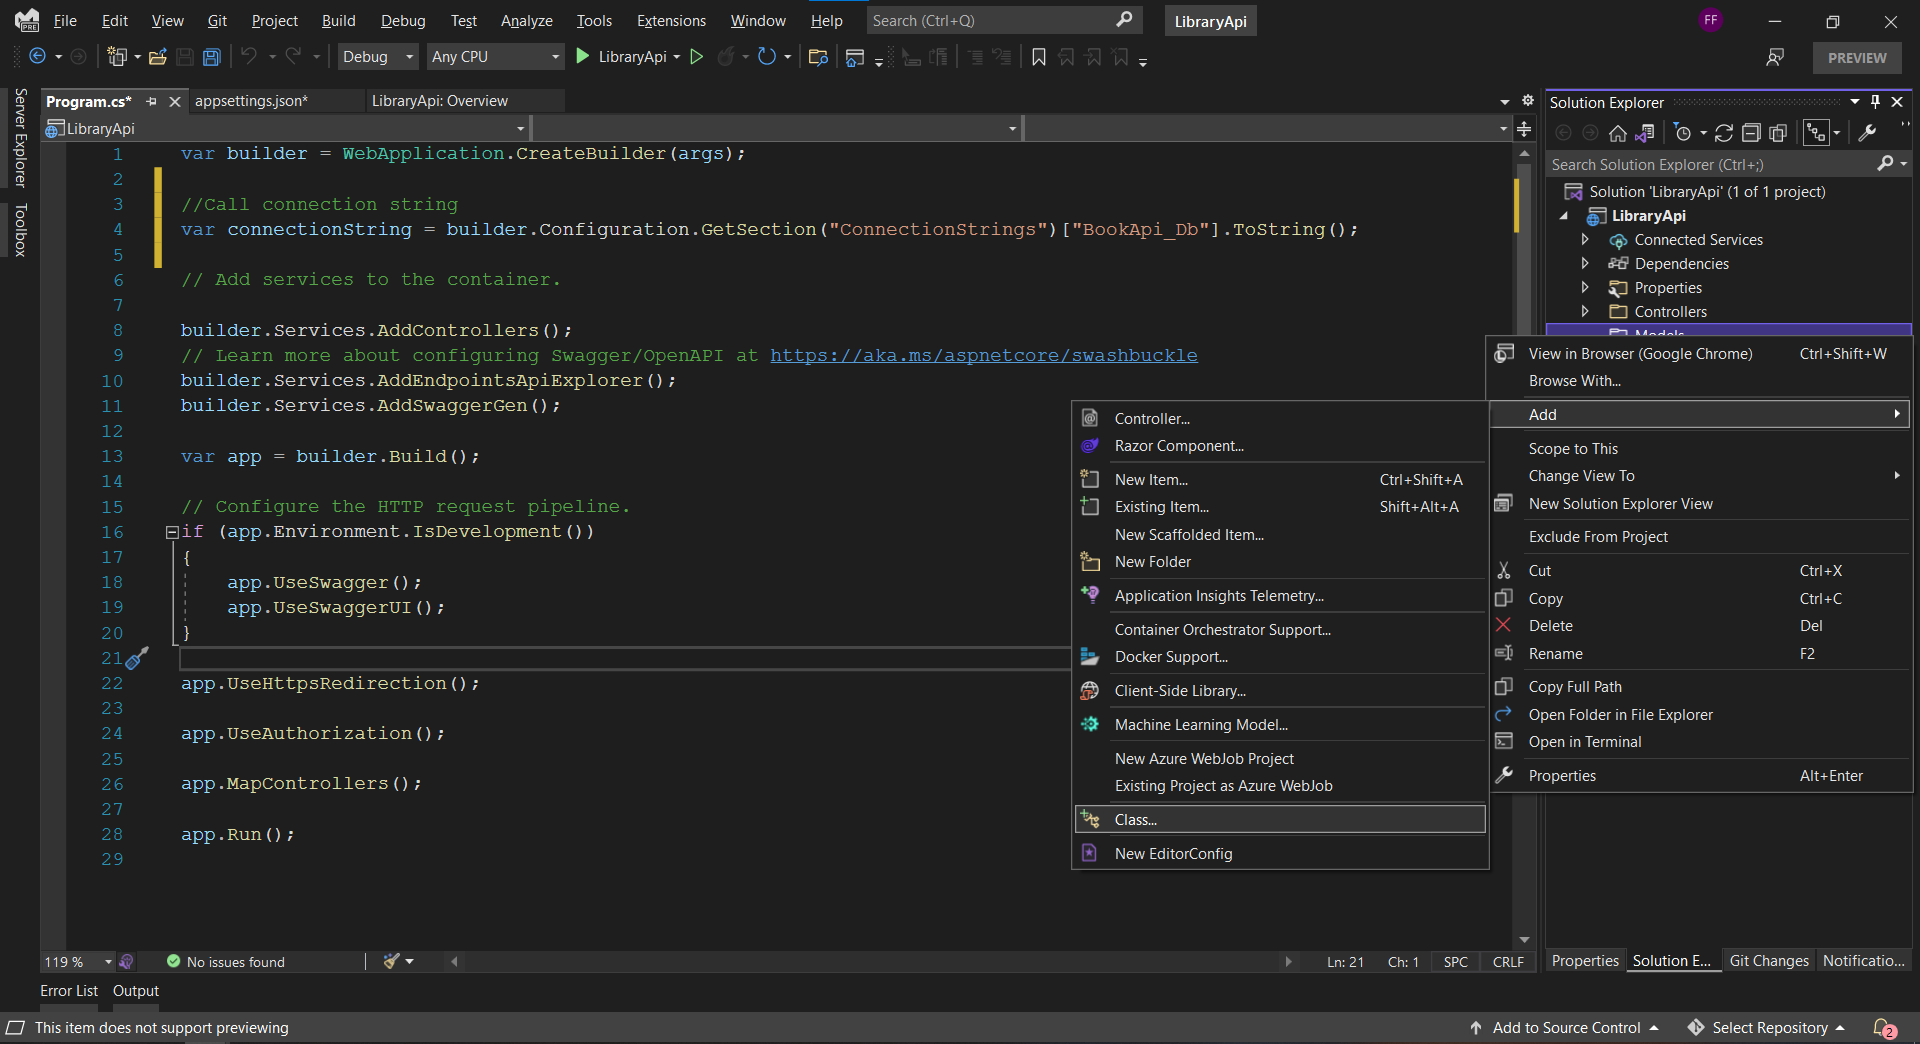
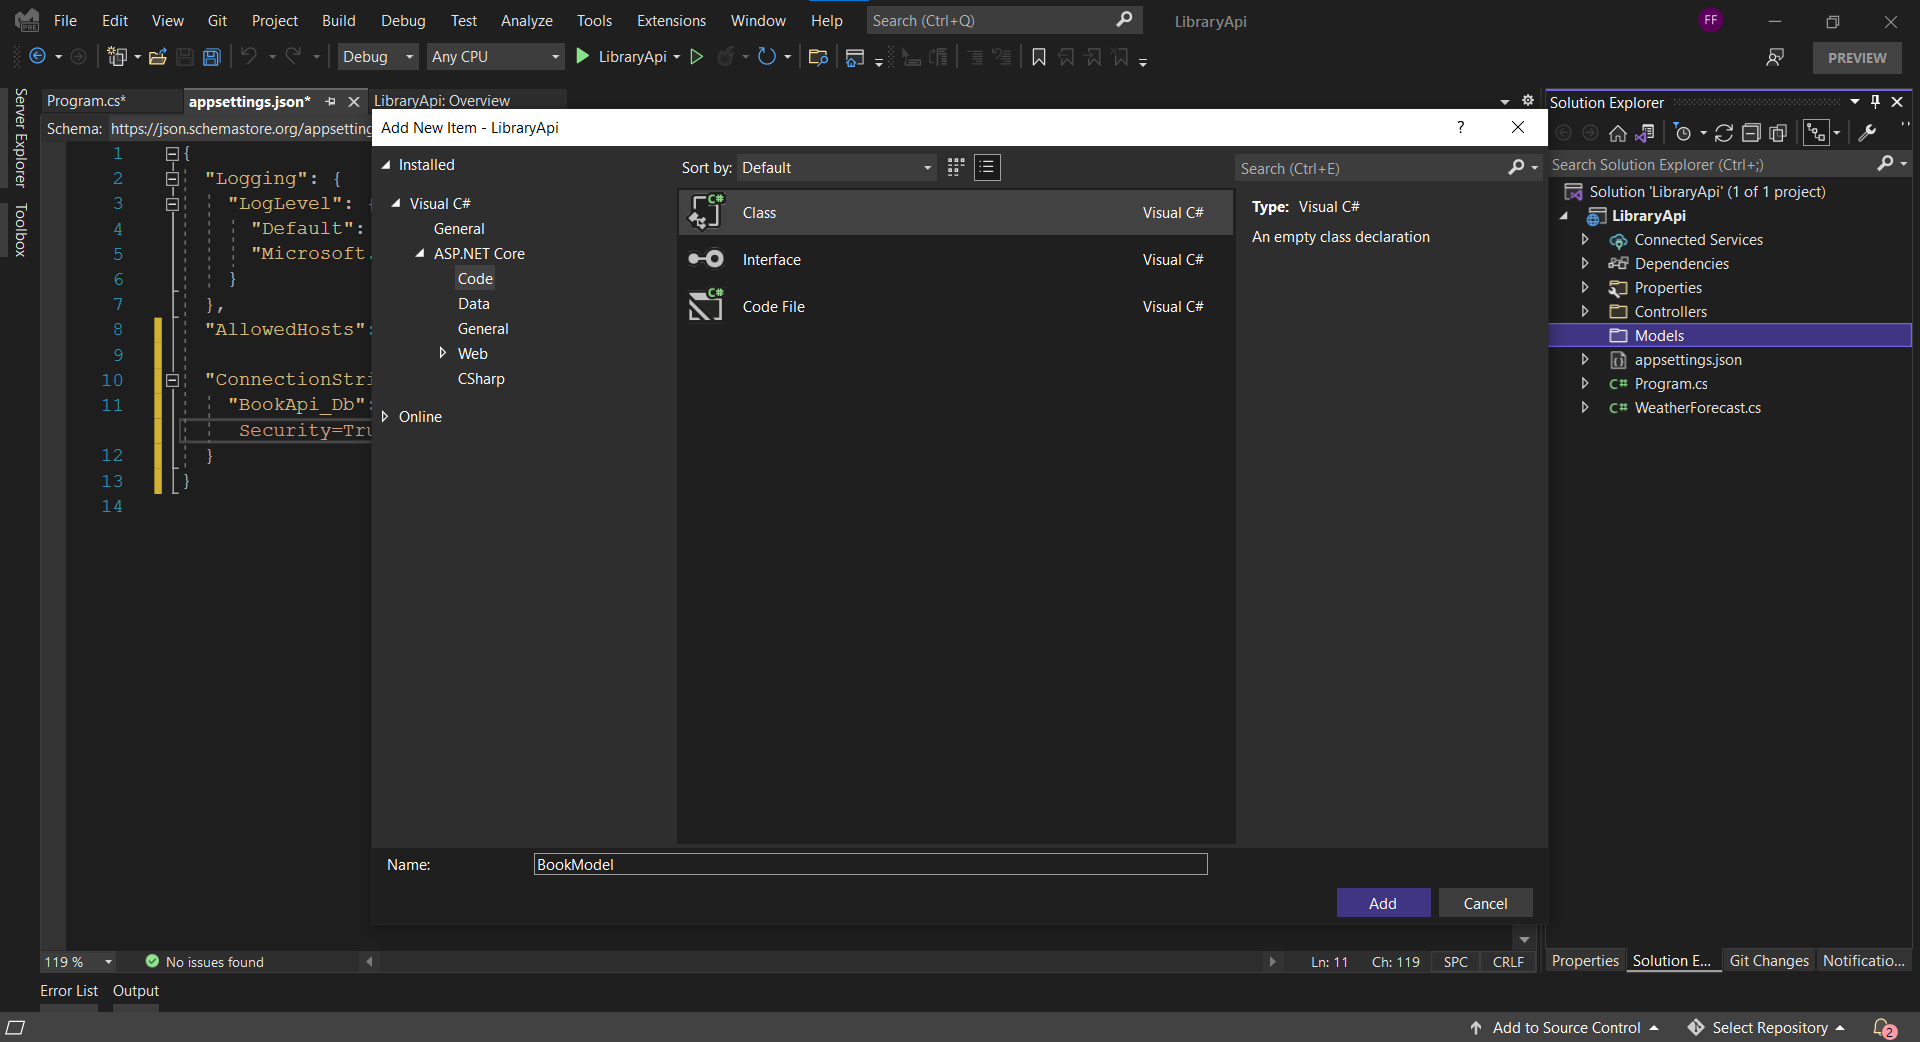
Now, right-click on the folder, navigate to the Add option, select New Class and name the class BookModel.
Right click -> Add -> New Class -> Name the class BookModel
Step 4: Add the Properties you Require from the Table
To do this part well, I advice using the exact name of the column whose value you would like to store per time. In this case, we would be storing:
- Id (Primary Key)
- Title
- Author
- Description
A primary key is a unique identifier used to differentiate data on each row of the table
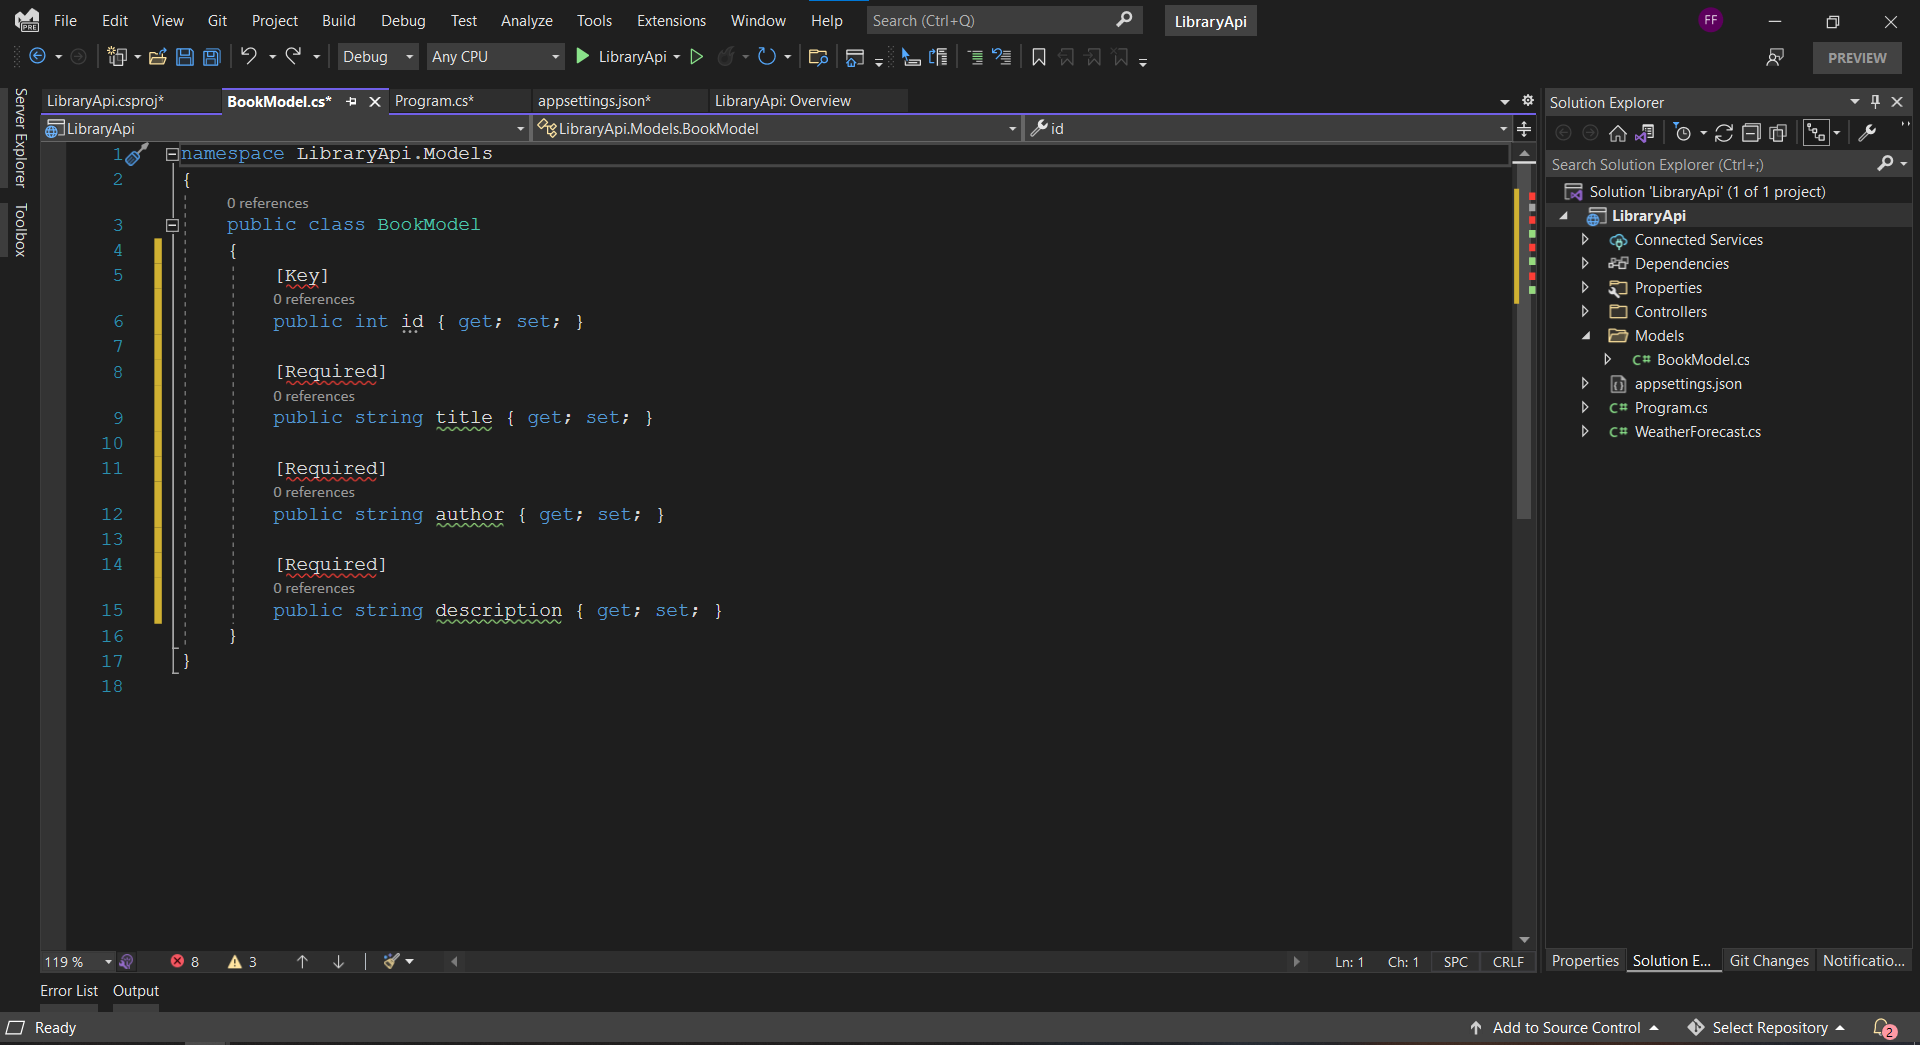
To get rid of the red lines, use the System.ComponentModel.DataAnnotations
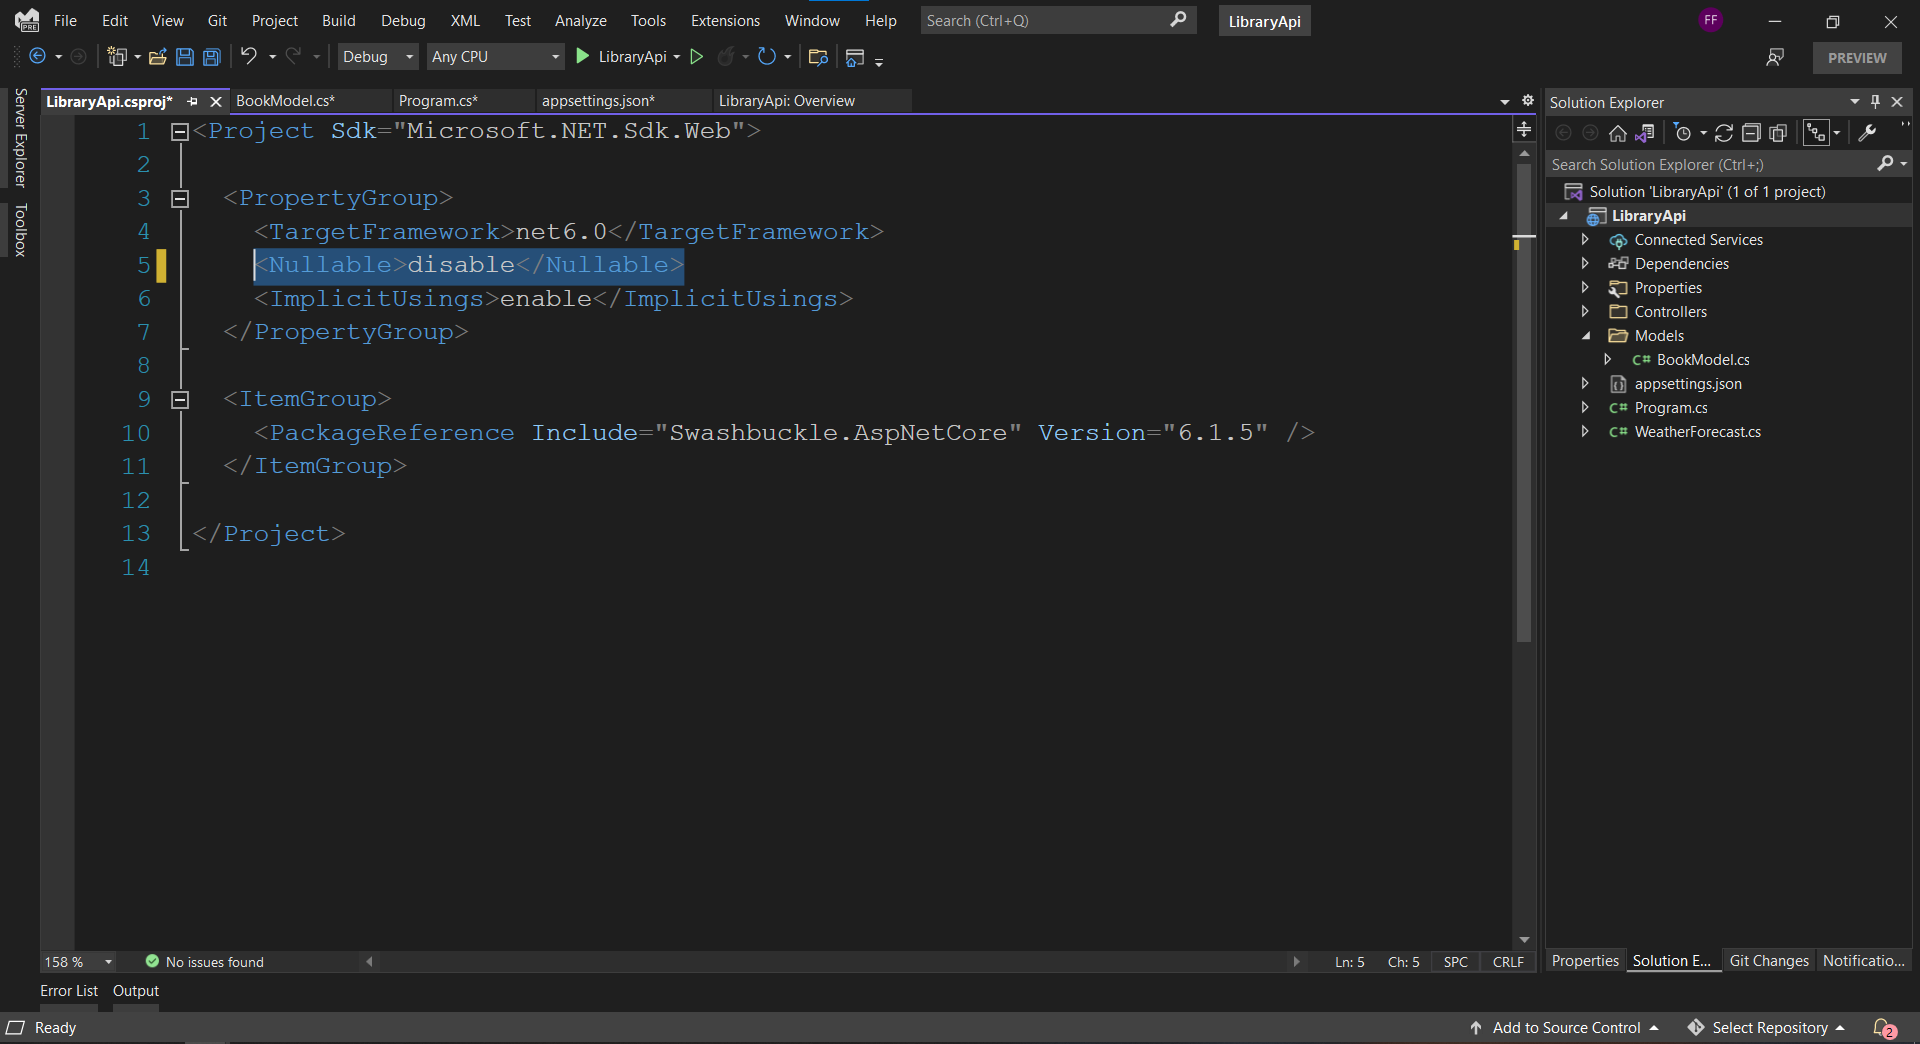
Also, disable the Nullable tag option in the .csproj file to get rid of the green squiggly lines with the error message Non-nullable property must contain a non-null value when exiting constructor. Consider declaring the property as nullable
Voila!!!

Step 5: Create a Folder Called Data to Hold the CRUD Methods
For this method, we need to create a folder called Data. This folder will hold two classes; SqlCrud and SqlAccess
SqlAccess will contain code that connects and talks to the database, while Sqlcrud will link our individual CRUD operations to our SqlAccess methods
Here's the code to our SqlAccess class
public class SqlDataAccess
    {
        public List<BookModel> LoadData(string sqlQuery, string connectionString)
        {
            List<BookModel> books = new List<BookModel>();
            using (SqlConnection conn = new SqlConnection(connectionString))
            {
                conn.Open();
                SqlCommand cmd = new SqlCommand(sqlQuery, conn);
                SqlDataReader reader = cmd.ExecuteReader();
                while (reader.Read())
                {
                    BookModel book = new BookModel();
                    book.Id = Convert.ToInt32(reader["id"]);
                    book.Title = Convert.ToString(reader["title"]);
                    book.Author = Convert.ToString(reader["author"]);
                    book.Description = Convert.ToString(reader["description"]);

                    books.Add(book);
                }
                reader.Close();

                return books;
            }
        }

        public List<BookModel> LoadDataById(int id, string sqlQuery, string connectionString)
        {
            List<BookModel> books = new List<BookModel>();
            using (SqlConnection conn = new SqlConnection(connectionString))
            {
                conn.Open();
                SqlCommand cmd = new SqlCommand(sqlQuery, conn);
                cmd.Parameters.AddWithValue("@id", id);
                SqlDataReader reader = cmd.ExecuteReader();
                while (reader.Read())
                {
                    BookModel book = new BookModel();
                    book.Id = Convert.ToInt32(reader["id"]);
                    book.Title = Convert.ToString(reader["title"]);
                    book.Author = Convert.ToString(reader["author"]);
                    book.Description = Convert.ToString(reader["description"]);

                    books.Add(book);
                }
                reader.Close();

                return books;
            }
        }

        public List<BookModel> PostNewBook(BookModel newBook, string sqlQuery, string connectionString)
        {
            List<BookModel> books = new List<BookModel>();

            using (SqlConnection conn = new SqlConnection(connectionString))
            {
                conn.Open();
                SqlCommand cmd = new SqlCommand(sqlQuery, conn);
                cmd.CommandType = System.Data.CommandType.StoredProcedure;
                cmd.Parameters.AddWithValue("@title", newBook.Title);
                cmd.Parameters.AddWithValue("@author", newBook.Author);
                cmd.Parameters.AddWithValue("@description", newBook.Description);
                SqlDataReader reader = cmd.ExecuteReader();
                while (reader.Read())
                {
                    BookModel book = new BookModel();
                    book.Id = Convert.ToInt32(reader["id"]);
                    book.Title = Convert.ToString(reader["title"]);
                    book.Author = Convert.ToString(reader["author"]);
                    book.Description = Convert.ToString(reader["description"]);

                    books.Add(book);
                }
                reader.Close();

                return books;
            }
        }
    }
Our SqlAccess.cs file will throw up a bunch of errors, however, these errors can be resolved by:
- Using the namespace holding your Model. In my case, using LibraryApi.Models
- Installing and using package System.Data.SqlClient
The code for our SqlCrud.cs file is:
public class SqlCrud
    {
        private readonly string _connectionString;
        SqlDataAccess sqlDataAccess = new SqlDataAccess();

        public SqlCrud(string connectionString)
        {
            _connectionString = connectionString;
        }

        public List<BookModel> GetAllBooks()
        {
            string sqlString = "select Id, Title, Author, Description from dbo.Books order by Id";

            return sqlDataAccess.LoadData(sqlString, _connectionString);
        }

        public List<BookModel> GetBookById(int id)
        {
            string sqlString = "select Id, Title, Author, Description from dbo.Books where id = @id";

            return sqlDataAccess.LoadDataById(id, sqlString, _connectionString);
        }

        public async Task<List<BookModel>> PostNewBook(BookModel newBook)
        {
            string sqlProcedure = "InsertNewBook";

            return await Task.FromResult(sqlDataAccess.PostNewBook(newBook, sqlProcedure, _connectionString));
        }
    }
Just like with our SqlAccess file, our application will throw up some errors. To eradicate these, use the namespace holding your Model - In my case, using LibraryApi.Models
Now it's time to call our methods as individual CRUD operations. But before that, I want to quickly explain why the constructor is taking a connectionString.
If we were to take stock of all the things we have now, they would be:
- A program file that reads our connection string and stores it in a variable
- A SqlAccess class that connects with the database with the supposed connection string
- A SqlCrud class that calls the methods in our SqlAccess class.
So, as you might have already guessed, the last pieces of the puzzle are to:
- Pass the connection string to the SqlCrud class
- Call the SqlCrud methods that connect to the database using the SqlAccess class
That's where the constructor comes in.
Awesome!
Step 6: Pass the Connection String to the SqlCrud Class
To pass your connection string to the SqlCrud class, simply create an instance of the class that takes in the connection string.
Like so:
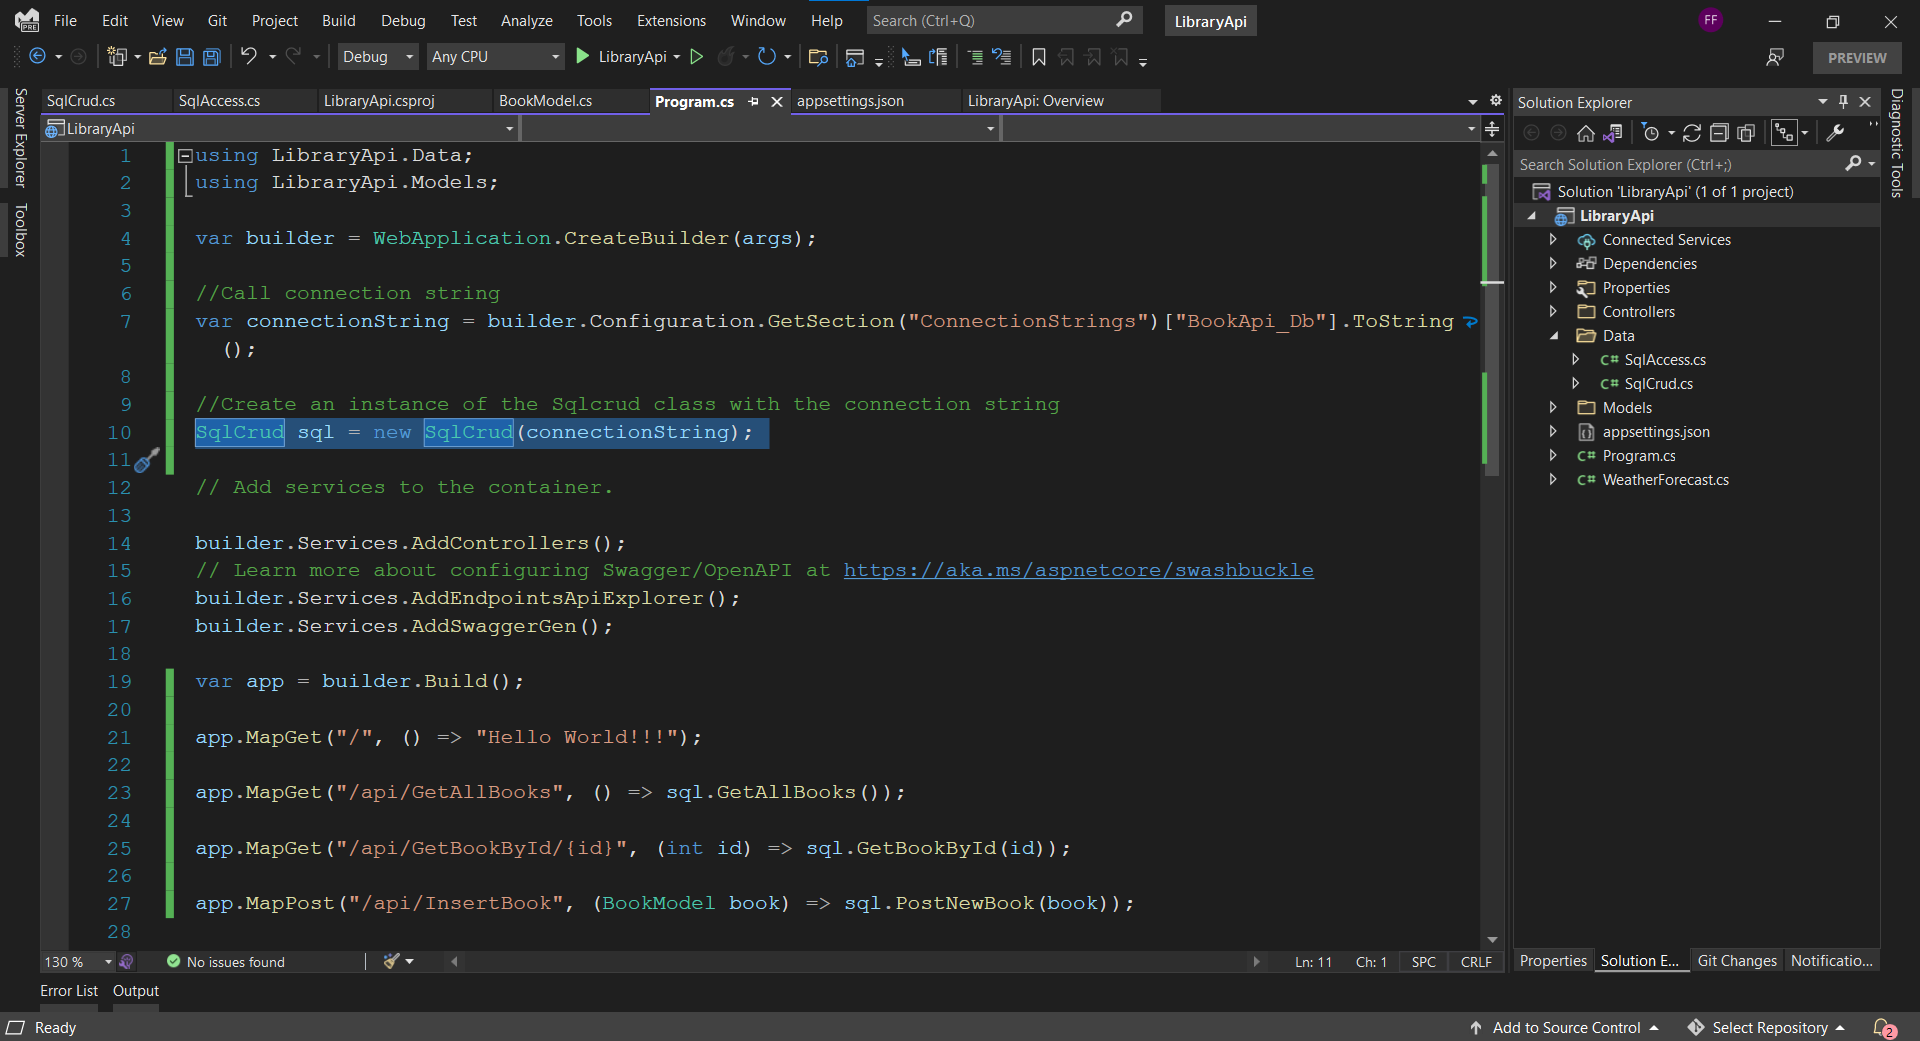
As usual, to get rid of the error messages, use the appropriate namespace.
Errors like these will always pop up when we create our classes within folders. This occurs because each folder is its own unique namespace. As such, we have to reference the namespace before we can call the class.
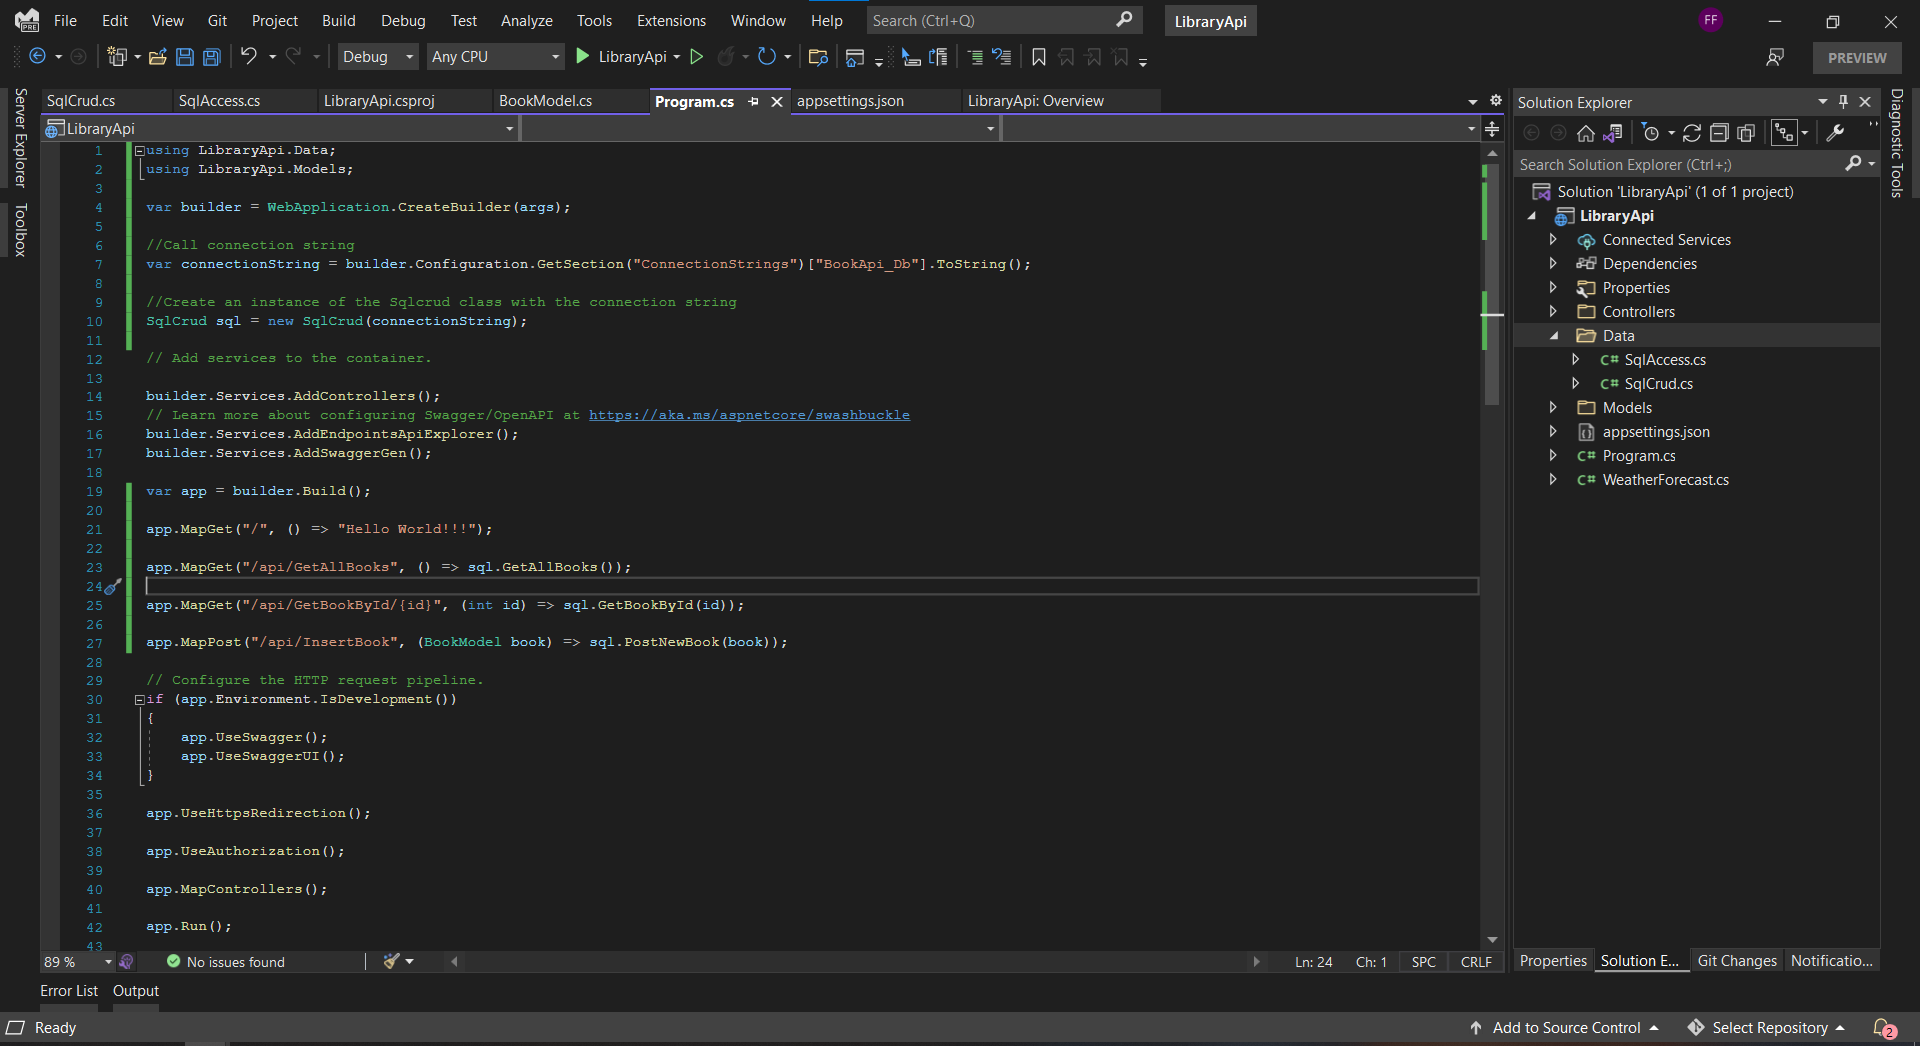
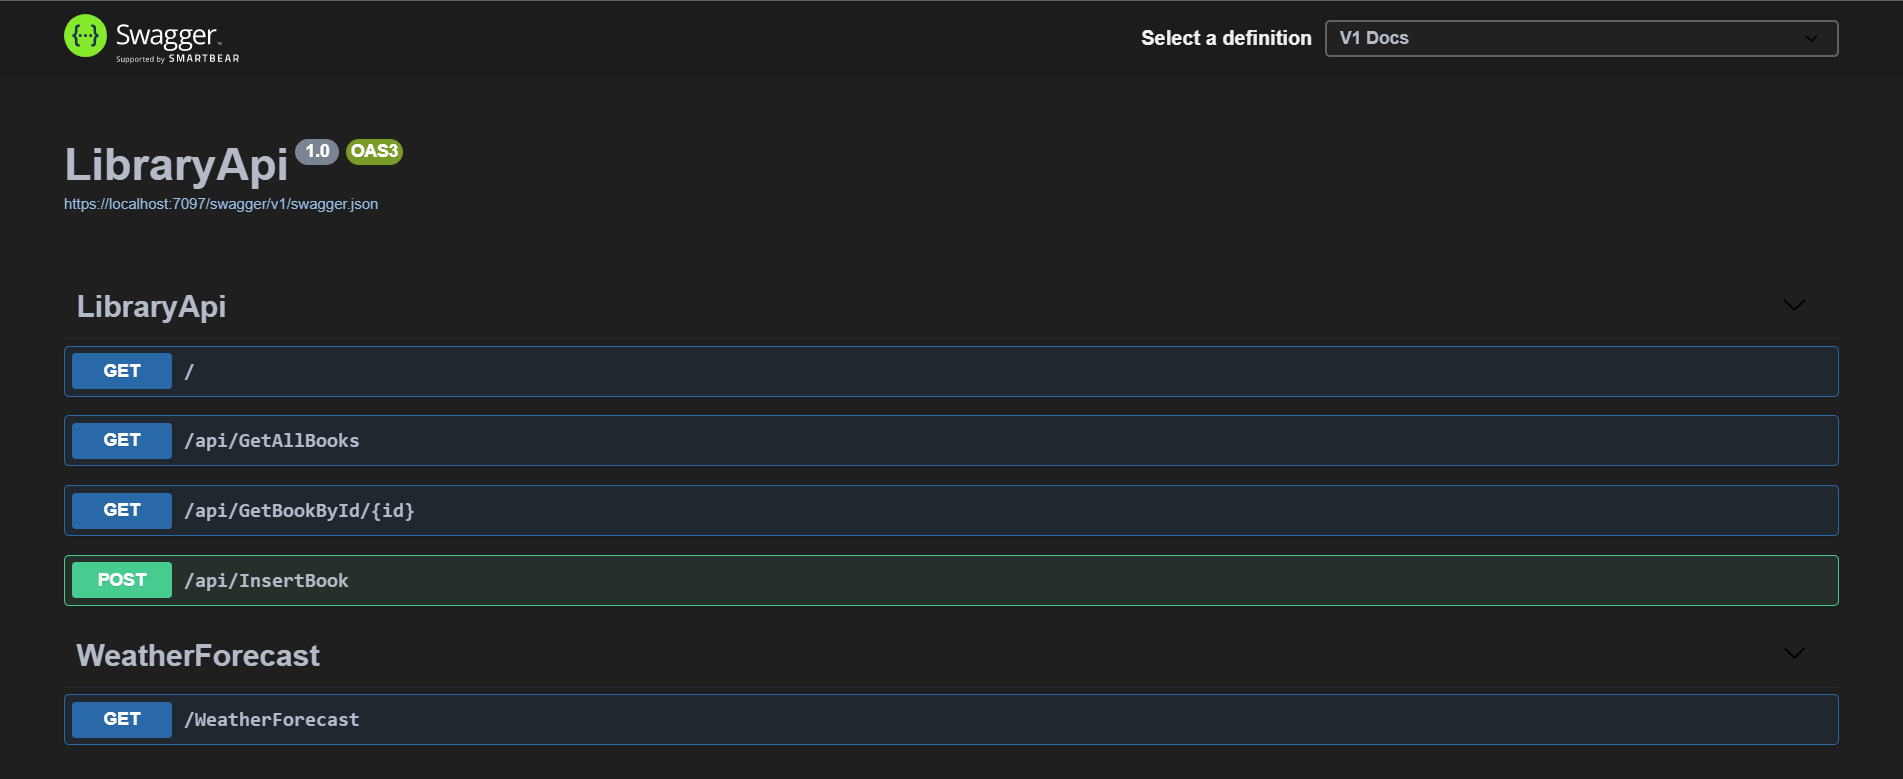
Once this is completed, we can call the individual SqlCrud methods using the Map method available to us in .Net 6.
I have attached a snippet of the code below.
var app = builder.Build();

app.MapGet("/", () => "Hello World!!!");

app.MapGet("/api/GetAllBooks", () => sql.GetAllBooks());

app.MapGet("/api/GetBookById/{id}", (int id) => sql.GetBookById(id));

app.MapPost("/api/InsertBook", (BookModel book) => sql.PostNewBook(book));
Step 7: Run the Application
Just before you run your application, I would implore you to crosscheck the connection string in your appsettings.json file. If you are using a copy of my application which I have placed in my GitHub repo, you'll see that I used localdb.
This is going to be totally different for you.
Now that that's out of the way, please kindly press the bright green play button just beside Any CPU😋

Your browser should look somewhat like this:
If you do not have data on your table, you can use the post method, while you can use the other methods to get data from the table.
Closing
In closing, I implore you to take this a step further by creating methods to update and delete existing data in your database. It'll help you learn better and frankly, it is quite fun.
Feel free to leave a comment below if you have any questions, comments, or suggestions, and as always, until next time guys, keep going after the life you want to live without compromising on your values.
✌🏼
You can find the source code in my GitHub repo below: https://github.com/FikemiGitHub/LibraryApi


